Quick start for macOS
OpenCue is an open source render management system. You can use OpenCue in visual effects and animation production to break down complex jobs into individual tasks. You can submit jobs to a queue that allocates rendering resources. You can also monitor rendering jobs from your workstation.
The sandbox environment provides a way to quickly start a test OpenCue deployment. You can use the test deployment to run small tests or for development work. The sandbox environment runs OpenCue components in separate Docker containers on your local machine.
This quick start takes approximately 20 minutes to complete.
Before you begin
You must have the following software installed on your machine:
- Python version 3.7 or greater
- The Python
pipcommand- On some systems this command may be installed as
pip3
- On some systems this command may be installed as
- Docker
- Docker Compose
- The
wgetcommand
Note
Docker compose is included in the desktop installation of Docker on macOS.You must allocate a minimum of 6 GB of memory to Docker. To learn how to update the memory limit on macOS, see Get started with Docker Desktop for Mac.
To install the wget command, you can use Homebrew:
brew install wget
If you don’t already have a recent local copy of the OpenCue source code, you must do one of the following:
-
Download and unzip the OpenCue source code ZIP file.
-
If you have the
gitcommand installed on your machine, you can clone the repository:git clone https://github.com/AcademySoftwareFoundation/OpenCue.git
Deploying the OpenCue sandbox environment
You deploy the sandbox environment using Docker Compose, which runs the following containers:
- a PostgresSQL database
- a Cuebot server
- an RQD rendering server
Note
In a production OpenCue deployment, you might run many hundreds of RQD rendering servers.The Docker Compose deployment process also configures the database and applies
any database migrations. The deployment process creates a db-data directory
in the sandbox directory. The db-data directory is mounted as a volume in
the PostgresSQL database container and stores the contents of the database. If
you stop your database container, all data is preserved as long as you don’t
remove this directory. If you need to start from scratch with a fresh
database, remove the contents of this directory and restart the containers
with the docker-compose command.
Docker Compose mounts volumes for the RQD rendering server on the host
operating system under /tmp/rqd/logs and /tmp/rqd/shots. RQD saves logs
to the logs directory. You specify the shots directory to save RQD output
when creating OpenCue jobs. On macOS, the docker-compose command
automatically creates the mount points for you.
To deploy the OpenCue sandbox environment:
-
Start the Terminal app.
-
Docker Compose mounts volumes for the RQD rendering server on the host operating system under
/tmp/rqd/logsand/tmp/rqd/shots. RQD saves logs to thelogsdirectory. You specify theshotsdirectory to save RQD output when creating OpenCue jobs.To create the mount points with the required permissions, run the following command:
Note
If you skip this step, the root account of the host operating system might incorrectly own the mount point directories.mkdir -p /tmp/rqd/logs /tmp/rqd/shots -
Change to the root of the OpenCue source code directory:
cd OpenCue -
Build the Cuebot container from source:
docker build -t opencue/cuebot -f cuebot/Dockerfile . -
To deploy the sandbox environment, run the
docker-composecommand:docker-compose upThe command produces a lot of output. When the setup process completes, you see output similar to the following example:
rqd_1     | 2019-09-03 16:56:09,906 WARNING   rqd3-__main__   RQD Starting Up
rqd_1     | 2019-09-03 16:56:10,395 WARNING   rqd3-rqcore     RQD Started
cuebot_1  | 2019-09-03 16:56:10,405 WARN pool-1-thread-1 com.imageworks.spcue.dispatcher.HostReportHandler - Unable
 to find host 172.18.0.5,org.springframework.dao.EmptyResultDataAccessException: Failed to find host 172.18.0.5 , c
reating host.
Leave this shell running in the background.
Installing the OpenCue client packages
OpenCue includes the following client packages to help you submit, monitor, and manage rendering jobs:
- PyCue is the OpenCue Python API. OpenCue client-side Python tools, such as
CueGUI and
cueadmin, all use PyCue for communicating with your OpenCue deployment. - PyOutline is a Python library that provides a Python interface to the job specification XML. You can use PyOutline to construct complex jobs with Python code instead of working directly with XML.
- CueSubmit is a graphical user interface for configuring and launching rendering jobs to an OpenCue deployment.
- CueGUI is a graphical user interface you run to monitor and manage jobs, layers, and frames.
cueadminis the OpenCue command-line client for administering an OpenCue deployment.pycuerunis a command-line client for submitting jobs to OpenCue.
To install the OpenCue client packages:
-
Open a second Terminal window.
-
Change to the root of the OpenCue source code directory:
cd OpenCue -
Create a virtual environment for the Python packages:
python3 -m venv sandbox-venv -
Activate the
sandbox-venvvirtual environment:source sandbox-venv/bin/activate -
To install the latest versions of the OpenCue client packages, you must configure the installation script with the version number. The script
sandbox/get-latest-release-tag.shwill automatically fetch this for you, but you can also look up the version numbers for OpenCue releases on GitHub.export VERSION=$(sandbox/get-latest-release-tag.sh) -
Install the Python dependencies and client packages in the
sandbox-venvvirtual environment:sandbox/install-client-archives.shNote
Alternatively, you can install the client packages from your local clone of the source code. However, the latest version of the OpenCue source code might include changes that are incompatible with the prebuilt OpenCue images of Cuebot and RQD on Docker Hub used in the sandbox environment. To install from source, runsandbox/install-client-sources.sh.
Testing the sandbox environment
To test the sandbox environment, run the following commands from the second Terminal window:
-
To verify the successful installation of the sandbox environment, as well as the connection between the client packages and sandbox, you can run the
cueadmincommand-line tool. To list the hosts in the sandbox environment, run the followingcueadmincommand:cueadmin -lhThe command produces output similar to the following:
Host Load NIMBY freeMem freeSwap freeMcp Cores Mem Idle Os Uptime State Locked Alloc Thread 172.18.0.5 52 False 24.2G 0K 183.1G 2.0 25.5G [ 2.00 / 25.5G ] Linux 00:04 UP OPEN local.general AUTO -
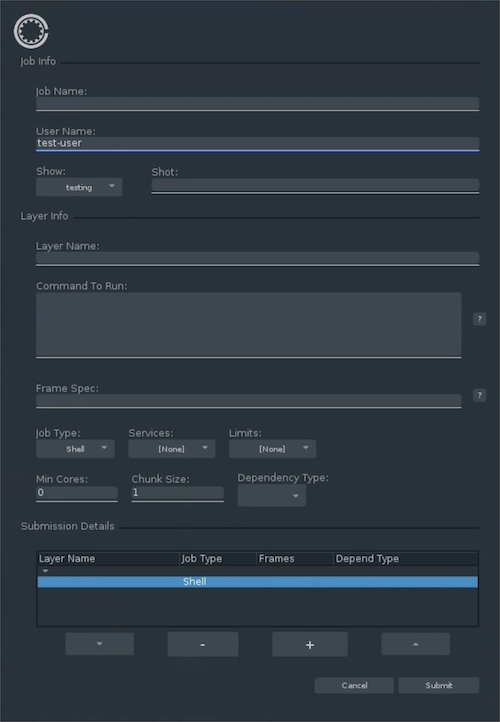
Launch the CueSubmit app for submitting jobs:
cuesubmit &The following screenshot illustrates the layout of CueSubmit as a standalone app:
-
By default, the OpenCue sandbox environment doesn’t include any rendering software. To experiment with the user interface, you can execute simple command-line shell scripts.
To execute a command-line shell script:
- For Job Name, type
HelloWorld. - For User Name, type
test-user. - For Shot, type
test-shot. - For Layer Name, type
test-layer. - For Command To Run, type the following command:
echo "Output from frame: #IFRAME#; layer: #LAYER#; job: #JOB#"- For Frame Spec, type
1-10.
This job consists of 10 frames, which each run a simple
echocommand. For each frame, theechocommand prints the frame number, layer name, and job name using replacement tokens such as#IFRAME#and#JOB#. - For Job Name, type
-
To submit the job to OpenCue, click Submit.
-
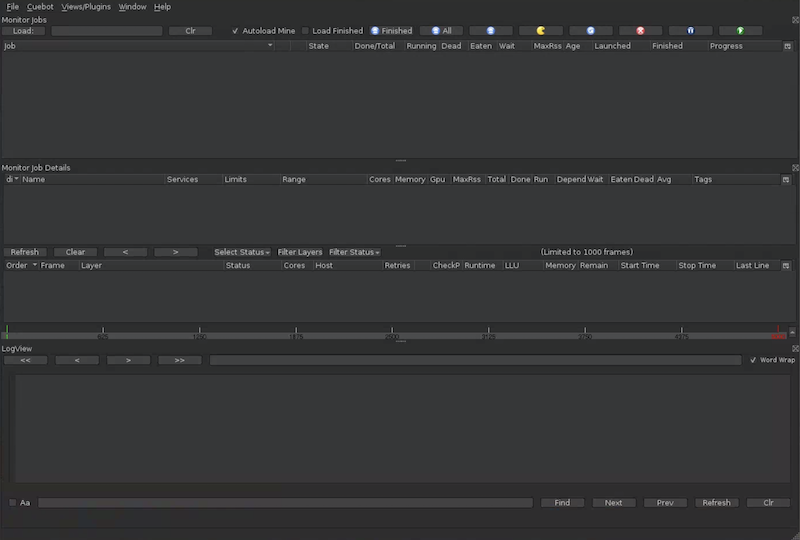
Launch the CueGUI Cuetopia app for monitoring jobs:
cuegui &The following screenshot illustrates the layout of CueGUI Cuetopia monitoring app:
-
Click Load.
CueGUI displays the job name
testing-test-shot-test-user_helloworldin the list of jobs. -
Double-click the job name.
CueGUI displays the list of frames in the job.
-
After OpenCue marks the status of a frame as
SUCCEEDED, click the corresponding row in the list of frames. -
In the LogView view, review the log output for the job to verify the frame produced output similar to the following:
Output from frame: 9; layer: test_layer; job: testing-test-shot-test-user_helloworld
Stopping and deleting the sandbox environment
To delete the resources you created in this guide, run the following commands from the second shell:
-
To stop the sandbox environment, run the following command:
docker-compose stop -
To free up storage space, delete the containers:
docker-compose rm -
To delete the PostgreSQL data directory created by the database setup process:
rm -rf sandbox/db-data -
To delete the virtual environment for the Python client packages:
rm -rf sandbox-venv
What’s next?
- To test submitting a Blender rendering job, see Customizing RQD rendering hosts.
- Learn more about OpenCue concepts and terminology.
- Install the full OpenCue infrastructure.
Feedback
Was this page helpful?
Glad to hear it! Please tell us how we can improve.
Sorry to hear that. Please tell us how we can improve.