Setting up a development environment on Windows
This is a guide to setting up a development environment on Windows that lets you run the entire OpenCue system, including Cuebot, CueGUI, and RQD. After you complete the setup, you can make changes to any part of the development environment.
Before you begin
First, clone the OpenCue git repository to your machine. You also need to download and install three core dependencies:
- PostgreSQL version 9 or greater
- Python 3.x
- Java SE JDK version 11 or greater
It’s also useful to install an IDEs. JetBrains has free community versions of the following options:
- PyCharm for Python
- IntelliJ IDEA for Java
Database setup
After installing PostgreSQL you need to create a database and user for OpenCue (specifically Cuebot) to use.
To do this you can either use the pgAdmin GUI, which is included with PostgreSQL on Windows, or the command-line PostgreSQL client.
Using the command-line
To set up the database using the command-line:
- Download the
schema-*.sqlandseed_data-*.sqlfiles from the the releases page.
Note
In older releasesseed_data.sql is called demo_data.sql.
-
Open Powershell, then run
psql:# Change the following path depending on what version of PostgreSQL you have: $psql = 'C:\Program Files\PostgreSQL\12\bin\psql.exe' & $psql -U postgres -
Enter the password you set during PostgreSQL installation.
-
Next, enter the following
psqlcommands to set up the user and database:
create user opencue with password 'INSERT PASSWORD HERE';
create database opencue;
\connect opencue
alter default privileges in schema public grant all privileges on tables to opencue;
\include schema-*.sql # actual filename changes depending on version
set search_path = public;
\include seed_data-*.sql # actual filename changes depending on version
\quit
Using the pgAdmin GUI
To set up the database using the pgAdmin GUI:
-
To start pgAdmin, open pgAdmin from the Start menu.
This adds an icon to the system tray.
-
Right-click the pgAdmin icon and click New pgAdmin window…, which will open in your browser.
-
Sign in with your PostgreSQL admin user credentials that you selected during the PostgreSQL installation.
-
To create a user, from the tree-view on the left, right-click Login/Group Roles and select Create→Login/Group Role….
-
Name the user
opencueand choose a secure password, then click Save. -
To create a database, from the tree-view on the left, right-click Databases and select Create > Database….
-
Name the database
opencue, then click Save.Next you need to populate the database.
-
To populate the database, as described in the instructions on the Setting up the Database page to populate the database, you can:
-
Download the latest
schema-*.sqlfrom the releases page. -
In pgAdmin right-click the
opencuedatabase, and select Query Tool…. -
In the Query Editor click 📂 (Open File icon) and open the
.sqlfile you downloaded. -
Click ▶ (Execute icon) to populate the database.
You also need the demo data to run the full environment locally.
-
-
To insert demo data, download the latest
seed_data-*.sqlfrom the releases page and run it against theopencuedatabase as described in the previous step.Note
In older releasesseed_data.sqlis calleddemo_data.sql. -
To grant permissions, in pgAdmin, right-click on the
opencuedatabase and select Grant Wizard. -
Use the select-all box to select all items, then select Next.
-
Add the
opencueuser and selectALLprivileges, then select Next again, and then click Finish.
Configure PyCue for local CueBot server
You need to change the default servers for the opencue Python library, so
that it can find your local Cuebot server.
Open pycue/opencue/default.yaml, and edit the end of the file to look like
the following:
cuebot.facility_default: local
cuebot.facility:
  local:
  - localhost:8443
Generate gRPC .proto files
Generating the .proto gRPC protocol files for RQD and the PyCue library is
currently a manual process. To generate the .proto files:
-
Open Powershell and install the required gRPC tools:
pip install grpcio-tools -
Change directory to the
protofolder. -
Run the following commands (from
proto/README.md):python -m grpc_tools.protoc --proto_path=. --python_out=../rqd/rqd/compiled_proto --grpc_python_out=../rqd/rqd/compiled_proto (ls *.proto).Name python -m grpc_tools.protoc --proto_path=. --python_out=../pycue/opencue/compiled_proto --grpc_python_out=../pycue/opencue/compiled_proto (ls *.proto).NameThe
.protofiles also need some post-processing to make them compatible with Python 3. The easiest way to do this is to install and run the2to3package. -
Run the following commands to install the
2to3package and complete the post-processing:pip install 2to3 2to3 -wn (ls ../rqd/rqd/compiled_proto/*_pb2*) 2to3 -wn (ls ../pycue/opencue/compiled_proto/*_pb2*)
Running Cuebot
Cuebot is the core component of OpenCue, written in Java.
To build and run it with IntelliJ IDEA:
-
Open IntelliJ IDEA and choose Open, select the
cuebotfolder in the git repository.The IDE downloads and sets up Gradle, if required, which can take some time.
-
Browse to the
src/main/java/com.imageworks/spcue/CuebotApplicationfile. -
Click Edit ‘CubotApplicat….main()'….
-
Update the Program arguments as follows and replace the value for
<PASSWORD>where indicated:--datasource.cue-data-source.jdbc-url=jdbc:postgresql://localhost/opencue --datasource.cue-data-source.username=opencue --datasource.cue-data-source.password=<PASSWORD> -
Click OK.
-
Click Run > Run ‘CuebotApplication’.
-
Verify that the output window doesn’t show any errors.
If it does, double-check that you have set up the database correctly, including permissions, and have set the Program arguments correctly.
Running CueSubmit
CueSubmit lets you submit jobs to OpenCue, written in Python.
To set up CueSubmit and run it with PyCharm:
-
Open PyCharm and choose Open, select the
cuesubmitfolder in the git repository. -
For the project interpreter, if you are working on other Python projects, we recommend seting up a virtual environment. Alternatively, you can leave the project interpreter set to the default Python interpreter.
-
PyCharm should prompt you to install ‘Package requirements’. If not, open the
setup.pyand the banner should appear. -
Select Install Requirements and wait for the packages to be installed.
PySide2 can take some time to install.
-
You need to add additional content roots to find the
opencueandoutlinelibraries. Under File > Settings, find Project: cuesubmit/Project Structure, then click ➕ (plus icon) next to Add Content Root and add thepycuefolder. -
Repeat the previous step for the
pyoutlinefolder. -
Select OK to exit.
-
Right-click
cuesubmit/__main__.pyand click Run.
Running CueGUI
CueGUI lets you monitor the status of jobs and rendering hosts. It is written in Python.
To set up CueGUI and run it with PyCharm:
-
Open PyCharm and click Open.
-
Select the
cueguifolder in the git repository. -
For the project interpreter, if you are working on other Python projects, we recommend seting up a virtual environment. Alternatively, you can leave the project interpreter set to the default Python interpreter.
-
PyCharm should prompt you to install ‘Package requirements’. If not, open the
setup.pyand the banner should appear. -
Select Install Requirements and wait for the packages to be installed.
PySide2 can take some time to install.
-
You need to add additional content roots to find the
opencuelibrary. Under File > Settings, find Project: cuegui/Project Structure, then click the ➕ (plus icon) next to Add Content Root and add thepycuefolder. -
Select OK to exit.
-
Right-click
cuegui/__main__.pyand click Run.
Running RQD
RQD is the OpenCue rendering host agent. It is written in Python.
To get set up and run it with PyCharm:
-
Open PyCharm and choose Open, select the
rqdfolder in the git repository. -
For the project interpreter, if you are working on other Python projects, we recommend seting up a virtual environment. Alternatively, you can leave the project interpreter set to the default Python interpreter.
-
PyCharm should prompt you to install ‘Package requirements’. If not, open the
setup.pyand the banner should appear. -
Select Install Requirements and wait for the packages to be installed.
-
Right-click
rqd/__main__.pyand click Run.
Verify your installation
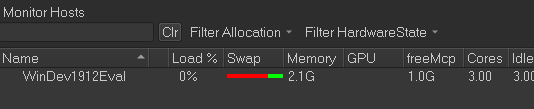
After you are running CueBot, CueGUI, and RQD simultaneously, you should be able to see the RQD host in CueGUI:
-
From the Views/Plugins menu, click Cuecommander > Monitor Hosts.
-
In the Monitor Hosts section, check the Auto-refresh box as illustrated by the following screenshot:
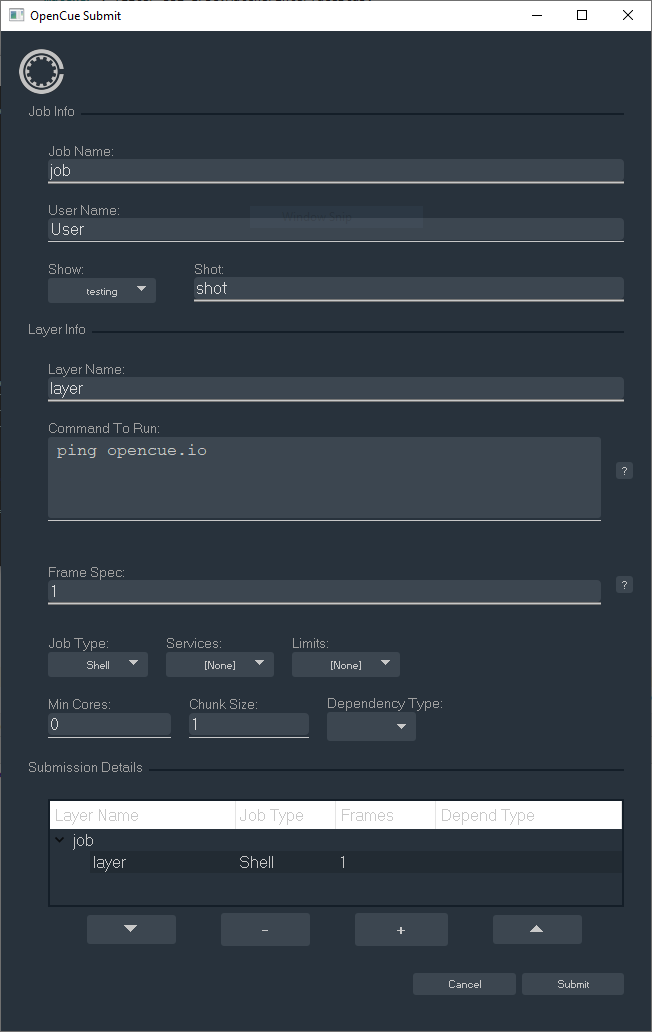
Next, check that you can run a job by using CueSubmit.
-
Switch to CueSubmit and fill out Job, Shot, and Layer Name fields as you like.
-
Set the Command to
ping opencue.io. -
Set Frame Spec to
1. -
Click Submit:
-
Switch back to CueGUI and verify that the job completes successfully:

This verifies that your end-to-end installation is working.
Feedback
Was this page helpful?
Glad to hear it! Please tell us how we can improve.
Sorry to hear that. Please tell us how we can improve.